Metal roofs have quickly become one of the most popular roofing choices for homeowners across the country. Known for their durability, energy efficiency, and design flexibility, they can last decades longer than traditional asphalt shingles. But with several different types of metal roof systems available, how do you know which one is best for your home?
Below, we’ll walk you through the most common options, highlight the pros and cons of each, and share our recommendation for coastal climates.
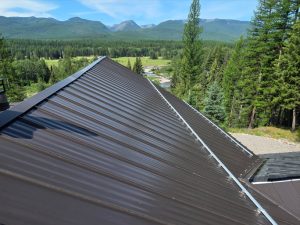
Standing Seam Metal Roof
What it is: Long vertical panels with raised seams that lock together. Fasteners are hidden, creating a clean and modern look.
-
Pros: Long lifespan (40–70+ years), sleek appearance, low maintenance, performs well in high winds and snow.
-
Cons: Higher cost, professional installation required, can be noisier during rain without proper insulation.
Best for homeowners who want a premium roof that will last and look sharp for decades.
Metal Shingles & Tiles
What it is: Steel or aluminum shaped to mimic traditional shingles, wood shakes, or even slate.
-
Pros: Traditional curb appeal, lighter weight than slate or tile, long lifespan (40–60 years).
-
Cons: May have more exposed fasteners, installation can be more labor-intensive.
Best for homeowners who want the look of a classic roof with the benefits of metal.
Corrugated Metal Panels
What it is: Wavy or ribbed panels often used on barns and farmhouses. Typically installed with exposed fasteners.
-
Pros: Affordable, lightweight, easy to install, very strong.
-
Cons: Exposed fasteners may loosen over time, less polished look, shorter lifespan (20–40 years).
Best for budget-friendly projects or homes with a rustic/industrial style.
Stone-Coated Steel
What it is: Steel panels coated with stone granules to mimic shingles or tile.
-
Pros: Traditional appearance, very durable, quiet in rain/hail, lifespan of 40–70 years.
-
Cons: Higher cost than asphalt, coating may fade over time, heavier than other metal options.
Best for homeowners who want the strength of metal with the look of traditional roofing.
Specialty Metals: Aluminum & Copper
-
Aluminum: Highly resistant to corrosion, making it ideal for coastal climates where salty air can cause steel to rust. Lightweight and durable, though generally more expensive.
-
Copper: A luxury option with unmatched beauty and longevity (80–100+ years). It develops a distinctive green patina over time, but comes with a premium price tag.
Important Notes on Metal Roofs
1. Don’t Mix Unlike Metals
Pairing dissimilar metals (e.g., copper with steel) can trigger a galvanic reaction, causing premature corrosion. Always work with a trusted professional who understands material compatibility.
2. Underlayment Life Expectancy
Even though metal panels may last 40–70+ years, the underlayment beneath them often has a shorter life. Depending on the material, underlayment may need replacement after 20–30 years, which means your roof system still requires professional oversight.
3. Maintenance & Inspections
No roof is truly “maintenance free.” Fasteners, flashings, sealants, and coatings can degrade over time. Routine roof inspections and preventative maintenance help catch small issues before they become costly repairs and keep warranties valid.
Choosing the Right Contractor
Many roofing companies may offer metal roofing installation because of homeowner demand. However, metal roofing is a highly specialized trade that requires precise workmanship, specialized tools, and experience. A poor installation can cut decades off your roof’s life expectancy.
Tips for Homeowners
-
Ask for photos of prior metal roof projects. Look for completed jobs similar in style and size to your home.
-
Request client reviews or references. Speaking directly with past clients can reveal how the contractor handled scheduling, communication, and workmanship.
-
Verify certifications and training. Ensure your contractor is trained in metal roofing systems and not just asphalt shingles.
-
Check licensing and insurance. Always confirm the contractor holds proper state licensing and carries liability and worker’s comp insurance.
-
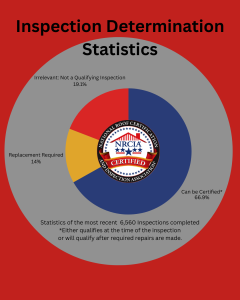
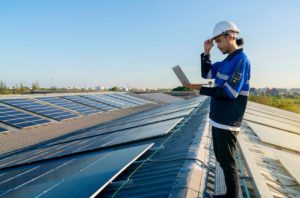
Schedule a professional inspection after installation. An independent NRCIA-certified inspector can confirm the system was installed correctly and help protect your investment.
HOAs, CC&Rs, and Community Aesthetics
With the rising popularity of metal roofs, many Homeowners Associations (HOAs) are revising their CC&Rs (Covenants, Conditions, and Restrictions) to allow or regulate metal roof products. While this creates more flexibility for homeowners, it also raises important considerations:
-
Wide variety of materials. Some metal systems mimic high-end slate or tile, while others are more cost-effective, industrial-looking panels.
-
Community aesthetics. A luxury home installing the lowest-cost corrugated panels may diminish the visual harmony of the neighborhood and even affect property values.
-
Why CC&Rs exist. These guidelines are intended to balance homeowner freedom with protecting the community’s overall curb appeal and property values.
Before committing to a metal roof, homeowners should review their HOA’s CC&Rs and, if necessary, submit proposed plans for approval.
Our Recommendation for Coastal Homes
If your home is near the ocean, aluminum is the most practical choice. Unlike steel, it will not rust in salty air, and it still provides decades of protection. For homeowners seeking a showpiece roof and willing to invest, copper is also an excellent option in coastal environments.
Final Thoughts
Metal roofing can be one of the best investments you make for your home. Whether you’re looking for sleek modern style, traditional charm, or maximum durability against the elements, there’s a system designed for your needs.
Before you choose, we recommend a professional roof inspection to ensure your home’s structure is ready and to help match you with the system that will provide the most value. An inspection after installation is equally important to verify correct installation, and ongoing routine inspections are key to protecting your investment over the long term.
You can find a trusted inspector near you in the NRCIA Member Directory.
Today’s Inspection… Tomorrow’s Protection®