Choosing the Right Metal Roof System for Your Home

Metal roofs have quickly become one of the most popular roofing choices for homeowners across the country. Known for their durability, energy efficiency, and design flexibility, they can last decades longer than traditional asphalt shingles. But with several different types of metal roof systems available, how do you know which one is best for your home?

Below, we’ll walk you through the most common options, highlight the pros and cons of each, and share our recommendation for coastal climates.


Standing Seam Metal Roof


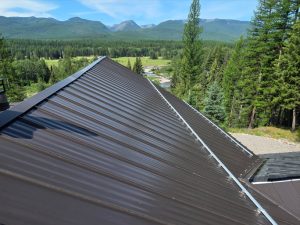
What it is: Long vertical panels with raised seams that lock together. Fasteners are hidden, creating a clean and modern look.

  • Pros: Long lifespan (40–70+ years), sleek appearance, low maintenance, performs well in high winds and snow.

  • Cons: Higher cost, professional installation required, can be noisier during rain without proper insulation.

Best for homeowners who want a premium roof that will last and look sharp for decades.

Metal Shingles & Tiles

What it is: Steel or aluminum shaped to mimic traditional shingles, wood shakes, or even slate.

  • Pros: Traditional curb appeal, lighter weight than slate or tile, long lifespan (40–60 years).

  • Cons: May have more exposed fasteners, installation can be more labor-intensive.

Best for homeowners who want the look of a classic roof with the benefits of metal.


Corrugated Metal Panels

What it is: Wavy or ribbed panels often used on barns and farmhouses. Typically installed with exposed fasteners.

  • Pros: Affordable, lightweight, easy to install, very strong.

  • Cons: Exposed fasteners may loosen over time, less polished look, shorter lifespan (20–40 years).

Best for budget-friendly projects or homes with a rustic/industrial style.

Stone-Coated Steel

What it is: Steel panels coated with stone granules to mimic shingles or tile.

  • Pros: Traditional appearance, very durable, quiet in rain/hail, lifespan of 40–70 years.

  • Cons: Higher cost than asphalt, coating may fade over time, heavier than other metal options.

Best for homeowners who want the strength of metal with the look of traditional roofing.

Specialty Metals: Aluminum & Copper

  • Aluminum: Highly resistant to corrosion, making it ideal for coastal climates where salty air can cause steel to rust. Lightweight and durable, though generally more expensive.

  • Copper: A luxury option with unmatched beauty and longevity (80–100+ years). It develops a distinctive green patina over time, but comes with a premium price tag.

Important Notes on Metal Roofs

1. Don’t Mix Unlike Metals

Pairing dissimilar metals (e.g., copper with steel) can trigger a galvanic reaction, causing premature corrosion. Always work with a trusted professional who understands material compatibility.

2. Underlayment Life Expectancy

Even though metal panels may last 40–70+ years, the underlayment beneath them often has a shorter life. Depending on the material, underlayment may need replacement after 20–30 years, which means your roof system still requires professional oversight.

3. Maintenance & Inspections

No roof is truly “maintenance free.” Fasteners, flashings, sealants, and coatings can degrade over time. Routine roof inspections and preventative maintenance help catch small issues before they become costly repairs and keep warranties valid.

Choosing the Right Contractor

Many roofing companies may offer metal roofing installation because of homeowner demand. However, metal roofing is a highly specialized trade that requires precise workmanship, specialized tools, and experience. A poor installation can cut decades off your roof’s life expectancy.

Tips for Homeowners

  • Ask for photos of prior metal roof projects. Look for completed jobs similar in style and size to your home.

  • Request client reviews or references. Speaking directly with past clients can reveal how the contractor handled scheduling, communication, and workmanship.

  • Verify certifications and training. Ensure your contractor is trained in metal roofing systems and not just asphalt shingles.

  • Check licensing and insurance. Always confirm the contractor holds proper state licensing and carries liability and worker’s comp insurance.

  • Schedule a professional inspection after installation. An independent NRCIA-certified inspector can confirm the system was installed correctly and help protect your investment.

HOAs, CC&Rs, and Community Aesthetics

With the rising popularity of metal roofs, many Homeowners Associations (HOAs) are revising their CC&Rs (Covenants, Conditions, and Restrictions) to allow or regulate metal roof products. While this creates more flexibility for homeowners, it also raises important considerations:

  • Wide variety of materials. Some metal systems mimic high-end slate or tile, while others are more cost-effective, industrial-looking panels.

  • Community aesthetics. A luxury home installing the lowest-cost corrugated panels may diminish the visual harmony of the neighborhood and even affect property values.

  • Why CC&Rs exist. These guidelines are intended to balance homeowner freedom with protecting the community’s overall curb appeal and property values.

Before committing to a metal roof, homeowners should review their HOA’s CC&Rs and, if necessary, submit proposed plans for approval.

Our Recommendation for Coastal Homes

If your home is near the ocean, aluminum is the most practical choice. Unlike steel, it will not rust in salty air, and it still provides decades of protection. For homeowners seeking a showpiece roof and willing to invest, copper is also an excellent option in coastal environments.

Final Thoughts

Metal roofing can be one of the best investments you make for your home. Whether you’re looking for sleek modern style, traditional charm, or maximum durability against the elements, there’s a system designed for your needs.

Before you choose, we recommend a professional roof inspection to ensure your home’s structure is ready and to help match you with the system that will provide the most value. An inspection after installation is equally important to verify correct installation, and ongoing routine inspections are key to protecting your investment over the long term.

You can find a trusted inspector near you in the NRCIA Member Directory.

Today’s Inspection… Tomorrow’s Protection®

Are Roof Rejuvenation Products a Good Investment for Asphalt Roofs?

Many property owners, homeowner associations, and 55+ communities are asking whether roof rejuvenation products are a smart alternative to full replacement. With commercials and marketing promising years of added roof life, it’s natural to wonder if this option could save money.

At the National Roof Certification and Inspection Association (NRCIA), our role is to provide unbiased guidance. NRCIA does not test or endorse rejuvenation products. Instead, we rely on the collective expertise of our certified inspectors and more than 30 years of case studies.


What Roof Rejuvenation Products Do


These treatments are designed to restore pliability in asphalt shingles, helping them resist brittleness as they age. In select cases, they may help a roof continue functioning until its expected lifespan is met.


Key Considerations Before Using Rejuvenation

Shingle Type and Life Expectancy

  • 3-Tab: ~15 -20 years

  • Dimensional: ~25–30 years

  • High-Definition/Luxury: ~30–35 years

Warranties Are Limited
Rejuvenation warranties usually last 5 years and focus only on shingle flexibility—not on preventing roof leaks.

Cost vs. Value
NRCIA field data shows that, in many cases, the money spent on rejuvenation can instead be invested in repairs and a LeakFREE® Roof Certification, which actually protects against leaks.


The NRCIA Approach: Inspect, Repair & Certify™

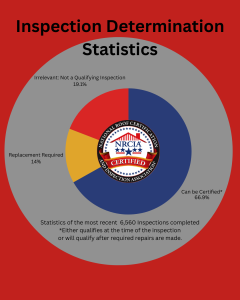
Our recommendation is always to start with a professional inspection. Out of most recent 6,460 roof inspections conducted nationwide, over 66% of roofs either qualify or can be repaired to qualify for a LeakFREE® Roof Certification. This certification provides assurance against leaks—something rejuvenation products generally do not offer. This data is slightly skewed as more than 19% of the remaining portion did not have a qualifying inspection performed, basically meaning that the 19.1% of inspections can be disregarded as these inspections were performed to see if the roof was in serviceable condition to receive solar, were installed according to manufacture specifications and local building codes or to determine the proximate cause of loss as it relates to an insurance claim to name a few.


Bottom Line

Roof rejuvenation may be an option in limited circumstances, but it should not replace proper inspection, repair, and certification. Deferring a replacement for too long often increases long-term costs.

If you’re considering this option for your community, schedule a certified NRCIA inspection first to establish the true condition of your roof system. Find a certified inspector near you through our Member Directory.

Today’s Inspection… Tomorrow’s Protection®

How to Prepare Your Roof for a Solar Panel Installation


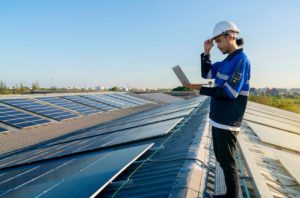
Switching to solar energy is one of the best decisions you can make for your home. Solar panels can lower your energy bills, reduce your carbon footprint, and even increase the value of your property. But before you can enjoy those benefits, there’s one important step you can’t overlook: making sure your roof is ready for solar panel installation.


Many homeowners don’t realize that the condition of their roof is just as important as the solar panels themselves. A strong, well-maintained roof helps protect your home; while also making sure your solar investment lasts for decades. That’s why working with a certified NRCIA inspector for both a pre- and post-installation inspection is key.


In this guide, we’ll walk through the steps you should take to prepare your roof, the role of inspections, and why attention to detail, even down to tasks like roof drilling, matters for your project’s success.


Why Your Roof Matters in Solar Installation
Think of your roof as the foundation for your solar system. If the roof isn’t solid, safe, or properly maintained, you may face costly problems later. Solar panels are designed to last 25–30 years. If your roof needs major repairs five years from now, you’ll need to remove the panels, fix the roof, and reinstall them, a process that can be expensive and time-consuming. That’s why it’s best to get everything right the first time. Preparing your roof before solar panels are installed will save you money, stress, and headaches in the long run.


Step 1: Schedule a Pre-Installation Inspection with an NRCIA Member

The first and most important step is to hire a certified NRCIA inspector for a pre-installation roofing inspection. NRCIA inspectors specialize in protecting property owners by providing unbiased, thorough roof assessments.

During a pre-installation inspection, the inspector will:

● Check for leaks, weak spots, or water damage.
● Look at the overall health of your shingles, tiles, or other roofing materials.
● Cursory review the structural support to ensure visible damage is not present. A further evaluation by a structural engineer is always recommended.
● Identify any areas where drilling or mounting hardware might cause problems if not handled correctly.

This detailed inspection ensures your roof can safely support solar panels and alerts you to repairs you should make before installation begins.


Step 2: Repair and Reinforce When Needed

If the inspection reveals issues, it’s best to fix them before moving forward. Common repairs include replacing worn shingles, fixing leaks, or reinforcing weak decking. Think of this step as setting the stage for your solar system. Just like a construction project requires solid ground for drilling and building, your solar panels require a strong, secure roof. Even small issues can grow into major problems if ignored.


Step 3: Plan for Mounting and Drilling

Solar panels are attached to your roof using specialized racking systems. These systems often require careful drilling into the roof to secure brackets and mounts. While this may sound risky, a professional installer knows how to protect your roof from leaks or damage during the process.

Here’s what happens during this stage:
● Installers carefully drill into rafters or trusses to attach mounting brackets.
● Flashing (a type of protective seal) is installed around each drilled area to prevent moisture infiltration.
● The racking system is placed and secured, ready to hold your solar panels.

This is another reason why a pre-inspection matters. Your NRCIA inspector can point out weak spots where drilling may cause issues, helping installers avoid costly mistakes.


Step 4: Post-Installation Inspection
Once your solar panels are installed, it’s wise to schedule a post-installation inspection with an NRCIA inspector. This step ensures the job was done correctly and that your roof is still in great shape without further damage.

During this inspection, the inspector will:
● Check all visible penetrations to confirm they have been integrated properly and remain watertight.
● Ensure the roof hasn’t been damaged by the installation process.

Think of this as a final seal of approval. It gives you peace of mind knowing both your roof and your solar panels are set up for long-term success.


Step 5: Plan for the Future
Your roof and solar panels should last for decades if cared for properly. Here are some tips for long-term success:

● Schedule yearly roofing inspections, especially after storms.
● Keep an eye on flashing and mounting points where drilling was done.

● Clean your solar panels when needed, but avoid harsh chemicals that could damage your roof.
● Work only with licensed contractors and NRCIA-certified inspectors for inspections, repairs, or adjustments.

By taking these steps, you’ll protect both your roof and your solar investment.


Common Questions About Solar Prep

Do I always need a roof inspection before solar panels?
Yes. Even if your roof looks fine from the ground, there may be hidden issues. An NRCIA-certified inspector can uncover problems that aren’t visible to the untrained eye.

What if my roof is too old for solar?
If your roof is nearing the end of its life, it’s best to replace it before solar panels are installed. Many homeowners choose to re-roof and then install solar at the same time.

Can solar panels damage my roof?
Not if they’re installed correctly. With proper flashing and careful drilling, your roof will remain watertight and strong. That’s why inspections and professional installers are so important.

Why Choose NRCIA for Roofing Inspections?
NRCIA inspectors follow a proven system that ensures property owners get the highest level of protection. Their inspections aren’t just quick looks—they’re detailed evaluations designed to give you full confidence in your roof’s condition.


By choosing NRCIA, you’re getting:
● Certified professionals trained in the latest inspection standards.
● Unbiased reports you can trust before making big decisions.
● Peace of mind that both your roof and solar panels are protected.

When it comes to long-term investments like solar energy, cutting corners on roof preparations is never worth it. NRCIA helps homeowners avoid the risks and enjoy all the benefits of renewable energy.


Final Thoughts
Solar energy is a smart, sustainable choice for your home—but it starts with your roof. Preparing your roof for solar panels isn’t just about installing equipment; it’s about protecting your home, your investment, and your future.
By working with NRCIA inspectors for both pre- and post-installation inspections, repairing weak spots, and paying attention to details like safe drilling and mounting, you’ll ensure your solar system is set up for decades of success. Your roof is more than just a surface for panels—it’s the foundation of your clean energy journey. Start strong, stay protected, and enjoy the power of the sun with confidence.