We have updated how emails are sent from InspectionPLUS. Originally when you emailed a client from InspectionPLUS (example: publishing and sending them an inspection report) the ‘from:’ address was support@inspectionplus.net
Now with the update, you can enable it so that any emails sent from InspectionPLUS will come from your email address. This will make it easier for you and your clients to better communicate any questions or issues.
Enabling this is not required but recommended. If you do not change anything, report emails will continue to be sent from support@inspectionplus.net
Below are step-by-step instructions. If you need help, please email support@nrcia.org and request a video call.
Part 1: Prepare your email information
You will need to know the following information
-Your email address (example@example.com)
-Your email password
-Your outgoing mail server (aka SMTP Server)
-Your outgoing server port (aka SMTP Port)
How to find your outgoing SMTP Server
SMTP Server for Gmail: smtp.gmail.com
SMTP Server for Outlook: smtp-mail.outlook.com
SMTP Server for AOL: smtp.aol.com
SMTP Server for Yahoo: smtp.mail.yahoo.com
SMTP Server for ICloud: smtp.mail.me.com
SMTP Server for Comcast: smtp.comcast.net
How to find your outgoing SMTP Port
SMTP Server for Gmail: 587
SMTP Server for Outlook: 587
SMTP Server for AOL: 587
SMTP Server for Yahoo: 587 or 465
SMTP Server for ICloud: 587
SMTP Server for Comcast: 587
Part 2: Update your inspector email
Upon logging into InspectionPLUS, click “My Profile” and then click the submenu labeled “Member Update.

Next, you will need to enter the information you collected in Part 1. Reminder, the email password is your personal email password, not your login password.

Click “Test” to confirm the settings. If it is properly processed you will see a green confirmation box(1) and receive a test email (2). Your personal inspector email is now setup!
(1)
(2)

Part 3: Update your company email
The company email can be set so that all emails from one company come from a specific email address instead of individual inspector emails. You can also add a separate email for accounting.
To adjust the Company Email settings, you will need to make sure your role (found on the upper right hand side) is changed to “Company”

Click “My Profile” and then click the submenu labeled “Company Emails”

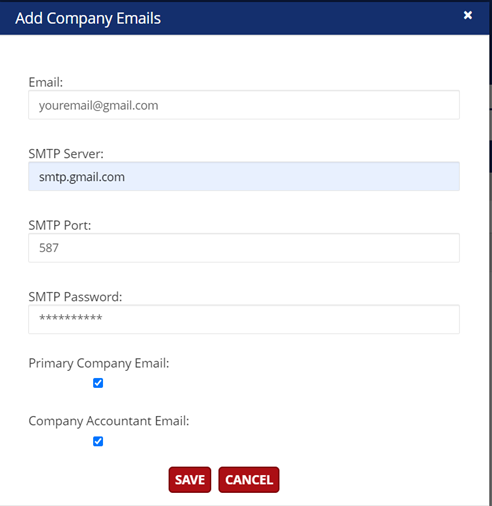
Click “+Add Company Emails”

Add in the information for your email and click “Save”. Refer to Part 1 for how to find your email server and port information.
Your company email is now set up. You can see which emails are active and if they are set to primary and accounting by viewing the taskbar. You can also send a test email to make sure the connection works by clicking the mail icon (highlighted in yellow below)
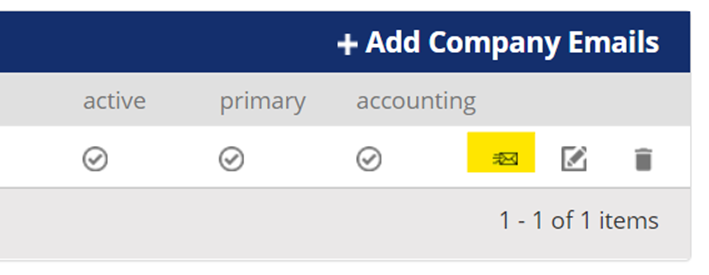
Please note that you can add multiple emails and edit/adjust them at any time. Here is an example from one NRCIA member

Part 4: GMAIL USERS ONLY
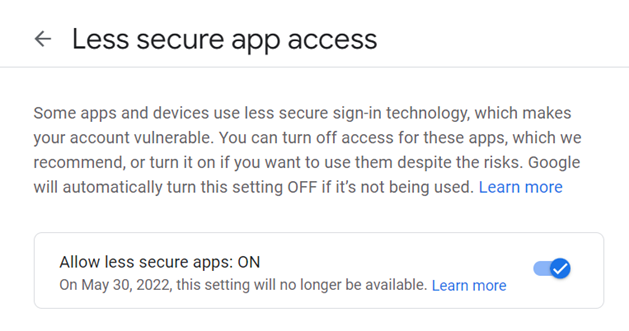
There is one extra step that gmail users will need to complete to enabled outbound emailing from InspectionPLUS. You will need to allow access for less-secured apps. Follow the steps below to finalize your setup.
Go to your Google account settings page: https://myaccount.google.com/
Click “Security” in the left-hand menu

Scroll down to the section labeled “Less secure app access” and click “>”

Turn on the less secure app access feature
Your email is all set! If you run into any issues pre or post-adjustment, please contact support@nrcia.org