The most common mistake people make when they find a roof leak? Assuming the problem is directly above the water stain. Water is a tricky element; it can travel along beams and behind walls before it ever makes an appearance on your ceiling. Chasing that stain can send you on a frustrating and fruitless search. A successful repair starts with an accurate diagnosis. This guide is about avoiding those common pitfalls and approaching the problem like a professional. We’ll show you how to think beyond the obvious and conduct a systematic search for the true entry point. A methodical roof leak cause determination is what separates a temporary patch from a lasting solution, ensuring you fix the right problem the first time.
Key Takeaways
- Focus on the common culprits first: Leaks often start in predictable places. Before assuming the worst, check for compromised shingles, cracked flashing around vents and chimneys, and clogged gutters, as these are the most frequent points of failure.
- Work backward from the inside: The water stain on your ceiling is the end of the trail, not the beginning. Start in your attic and trace the water damage upward to its highest point to find the true entry point on your roof.
- Recognize when to call a professional: If a roof is steep, the leak’s source is elusive, or you want a guaranteed solution, it’s time to call an expert. A certified inspector has the tools and safety training to provide an accurate diagnosis and a long-term fix.
What Causes a Roof to Leak?
That telltale drip from the ceiling can send any property owner into a panic. But before you start worrying about the worst-case scenario, it helps to understand what’s actually happening up there. Roof leaks aren’t random; they’re caused by specific failures in your roofing system. Most leaks start small and can be traced back to a handful of common culprits, from simple aging to storm damage. Pinpointing the general cause is the first step toward a fast and effective fix.
Natural Wear and Tear Over Time
Just like anything else, a roof has a finite lifespan. Day after day, it’s exposed to UV rays, rain, wind, and fluctuating temperatures. Over the years, this constant exposure breaks down roofing materials. Shingles can become brittle, sealants can dry out and crack, and the underlying structure can weaken. This gradual degradation is often the root cause of mysterious leaks that appear without an obvious event like a storm. Regular inspections are your best defense, as they can catch age-related issues before water finds its way inside. A LeakFREE® roof certification can provide peace of mind by ensuring your aging roof is still up to the task of protecting your home.
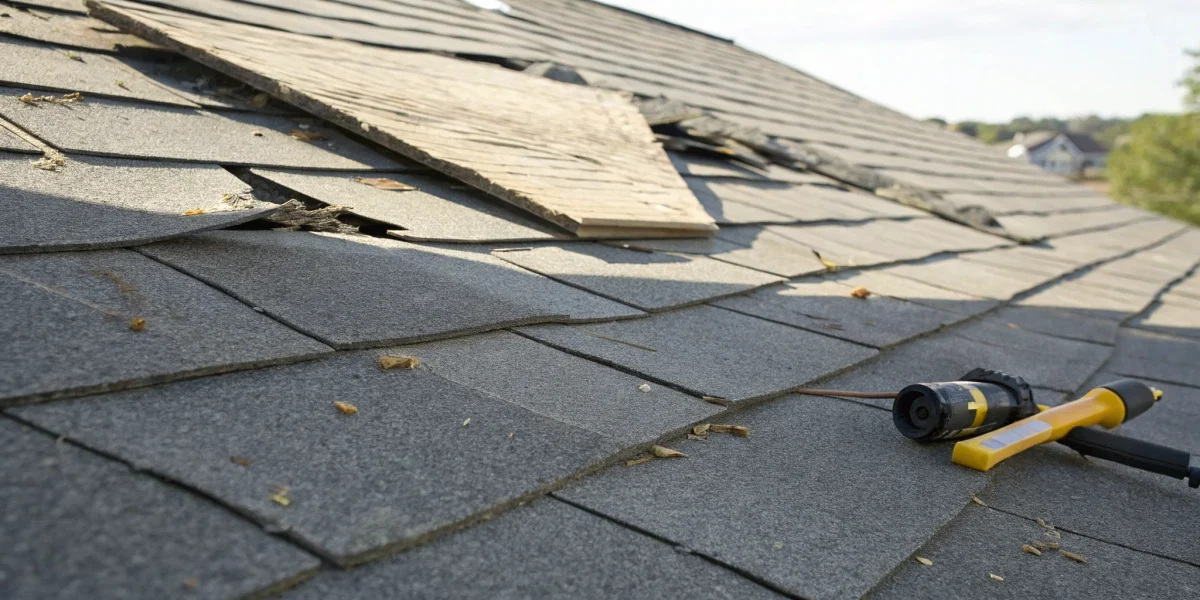
Cracked, Curled, or Missing Shingles
Think of shingles as your roof’s armor. When that armor is compromised, the vulnerable layers underneath are exposed to the elements. High winds can lift and tear shingles right off, while hail can cause significant cracks and breaks. Even age can cause shingles to curl at the edges, creating a perfect entry point for rainwater. A single missing or damaged shingle is all it takes for water to seep into the roof deck, potentially leading to rot, damaged insulation, and mold growth inside your attic and home. This is one of the most common and visible causes of a roof leak, making it a key area to check during any visual inspection.
Failed Flashing and Seals
Flashing is one of those things you probably don’t notice until it fails. These thin strips of metal are installed wherever your roof meets a vertical surface—think chimneys, skylights, vents, and walls. Their job is to create a watertight seal in these vulnerable joints. Over time, flashing can rust, crack, or pull away from the structure due to expansion and contraction. The caulk or sealant used to secure it can also degrade and shrink. When flashing fails, it creates a direct channel for water to enter your home, making it a primary suspect in many leak investigations. A thorough check of all flashing is a standard part of any professional roof inspection.
Backed-Up Gutters and Drains
It’s easy to forget about your gutters, but they play a critical role in protecting your roof. Their purpose is to direct rainwater away from your roof and foundation. When gutters become clogged with leaves, twigs, and other debris, that water has nowhere to go. Instead, it pools at the edge of your roof, seeping underneath the shingles and into the structure. In the winter, clogged gutters can contribute to the formation of ice dams, which present an even greater threat. Consistent gutter cleaning is a simple but essential piece of home maintenance that can prevent costly water damage and protect the integrity of your entire roofing system.
Storm Damage and Ice Dams
Severe weather is a major cause of sudden roof leaks. Strong winds can lift shingles, and hail can create cracks and dents that compromise your roof’s integrity. Beyond immediate storm damage, winter weather brings the unique problem of ice dams. These occur when snow melts on a warmer section of your roof and then refreezes at the colder edge, forming a ridge of ice. This ridge blocks proper drainage, causing melting snow to pool behind it and work its way under the shingles. This is a common issue for the homeowners and real estate professionals we work with in colder climates and often requires a professional to resolve safely.
How to Find the Source of a Roof Leak
That tell-tale drip or ceiling stain is a homeowner’s nightmare. But before you panic, you can play detective. Finding the source of a roof leak requires a methodical approach, starting from the inside out. Here’s a step-by-step guide to help you trace the water back to its entry point.
Start Your Search Inside
Your first move shouldn’t be climbing a ladder. Instead, head inside to the room directly below where you see signs of a leak. If you have an attic, that’s your primary search area. Grab a good flashlight and look for the most obvious evidence. This initial indoor check helps you narrow down the general location of the problem without stepping foot on the roof. It’s the safest and most efficient way to begin your investigation. By pinpointing the area of water damage inside, you create a starting point for your search, giving you a much better idea of where to focus your attention when you eventually inspect the exterior of your roof.
Inspect the Attic for Clues
Once you’re in the attic, your flashlight is your best friend. Scan the underside of the roof deck for water stains, dark spots, or signs of mold and mildew. Pay close attention to the insulation—is it damp, compressed, or discolored? These are all red flags. Be sure to methodically check the areas where leaks most often occur: around chimneys, roof vents, plumbing stacks, and skylights. Any place where something penetrates the roof is a potential weak point. A thorough internal inspection is what our certified professionals are trained to do, as it often reveals the most critical clues about a leak’s origin before they even look at the roof itself.
Follow the Water Trail
Here’s where things can get tricky. Water rarely drips in a straight line. It can hit the roof sheathing, run along a rafter or truss, and travel a surprising distance before it finally soaks through your ceiling. This means the stain on your living room ceiling might be several feet away from the actual breach in your roof. Don’t assume the leak is directly above the damage. Instead, try to trace the path of the water stains in your attic back to their highest point. This upward trail is your best bet for finding the true entry point. It takes a bit of patience, but following the evidence is key to solving the mystery.
Perform a Water Test
If you’ve done an internal check but still can’t find the source, a controlled water test can help. This is a two-person job. Have one person safely go outside with a garden hose while another stays inside, watching the suspected leak area. Start by soaking the roof low down, just above where you see the interior damage. Isolate small sections at a time, waiting a few minutes between each one. Have your helper inside shout when they see a drip. This process helps you mimic rainfall and pinpoint the exact spot where water is getting in. Just remember to use a gentle stream of water—you’re not trying to pressure wash your shingles off.
Head Outside for a Visual Check
When it’s safe to do so, a visual inspection of your roof’s exterior can confirm your suspicions. From the ground with binoculars or carefully from a ladder, look for anything out of the ordinary. Are there any cracked, curled, or missing shingles? Check the flashing—the metal strips around chimneys, vents, and valleys—for rust, gaps, or loose sealant. Look for exposed or rusted nail heads, as water can seep in around them. This is often where small leaks begin. For complete peace of mind and a guaranteed solution, a professional assessment can identify not just the current problem but also potential future issues, which is the goal of our LeakFREE® roof certification.
Key Warning Signs of a Roof Leak
A roof leak rarely announces itself with a dramatic drip. More often, it starts with subtle clues inside your home that are easy to dismiss if you don’t know what to look for. Catching these early warning signs is the key to preventing minor issues from turning into major problems like structural damage, mold growth, and expensive repairs. A leaky roof can cause serious problems if you don’t fix it quickly, compromising everything from your attic insulation to your home’s framework. Whether you’re a homeowner keeping an eye on your property or a real estate professional advising a client, knowing these signs can save you a massive headache down the road. A thorough inspection involves looking beyond the obvious, and these are the tell-tale signs that a professional will be searching for. By learning to spot these indicators, you can take action sooner, protecting your investment and ensuring the safety of your home.
Stains on Ceilings and Walls
One of the most common signs of a roof leak is a discolored stain on a ceiling or wall. These spots often look like brownish or yellowish rings and can grow over time. Don’t be fooled if the stain isn’t directly under your roofline; water can travel along rafters and wall frames before it soaks through your drywall. Ignoring these stains is a mistake, as a persistent leak can compromise your home’s structure. Addressing the source of the leak quickly is the first step toward securing a long-term solution like LeakFREE® roof protection.
Spots of Mold or Mildew
Where there’s unwanted water, mold and mildew are sure to follow. If you notice fuzzy or slimy spots—often black, green, or gray—on your ceilings or in the corners of your walls, you likely have a moisture problem. This is especially common in poorly ventilated areas like attics and closets. You might even see mildew or smell a strong, musty odor before you see any visible water damage. Because mold can pose health risks, it’s important to address it immediately with a professional roof inspection to find and fix the underlying leak.
Bubbling or Peeling Paint
Have you noticed paint starting to bubble, blister, or peel on your walls or ceilings? This is a clear indicator that water is getting trapped behind the paint. As moisture saturates the drywall or plaster underneath, it causes the paint to lose its adhesion and pull away from the surface. You might see this near window frames or in corners first. While high humidity can sometimes be the culprit in bathrooms, bubbling or peeling paint in other rooms, especially on the top floor, almost always points to a leak that needs your attention. It’s a visual cue that the materials making up your wall are compromised.
A Damp, Musty Smell
Sometimes you can smell a leak before you can see it. A persistent, earthy, or musty odor that you can’t seem to air out is a strong signal of hidden moisture and potential mold growth. This smell is often most noticeable in attics, basements, or closets on the upper floor. Your sense of smell can be a powerful tool for leak detection, and it’s something certified inspectors are trained to pay close attention to. If something smells off, trust your instincts and start investigating for other signs of water intrusion.
Dark Spots and Rusted Fasteners
If you can safely access your attic, take a look at the underside of the roof deck. Dark stains or streaks on the wood sheathing are a dead giveaway that water has been seeping through. Also, pay close attention to the nails and fasteners. Rusty nails are a tell-tale sign of where moisture has been getting in, as the condensation and direct contact with water cause them to corrode over time. These are the kinds of specific details that inspectors document in their findings to pinpoint the exact location and cause of a leak.
Common Mistakes to Avoid When Finding a Leak
When you spot a water stain, the immediate goal is to find the source and stop it. But in the rush, it’s easy to make a few common missteps that can waste time or even make the problem worse. Let’s walk through some of the most frequent mistakes so you can avoid them and find that leak with confidence.
Assuming the Leak Is Right Above the Stain
It’s logical to think that if you see a water spot on your ceiling, the leak must be directly above it. Unfortunately, water is sneaky. It can enter your roof in one spot, travel along rafters, insulation, or ceiling panels, and only show up once it finds a low point to drip from. This means the actual entry point could be several feet away from where you see the damage. Chasing the stain alone can lead you on a wild goose chase, so it’s important to look at the bigger picture in your attic and on the roof itself.
Confusing Condensation for a Leak
Not every damp spot is a roof leak. Sometimes, the culprit is condensation caused by poor attic ventilation. When warm, moist air from inside your home rises and hits the cold underside of the roof, it can condense and drip, looking just like a leak. A plumbing issue in the attic could also be the source. A professional can tell the difference, which is why a thorough inspection is so important. Getting an accurate diagnosis saves you from spending money on roof repairs when the real problem is ventilation or a leaky pipe.
Poking Holes in Your Ceiling
Seeing a bulge of water in your ceiling is alarming, and it might seem like a good idea to poke a hole to relieve the pressure. Please don’t do this. Without knowing what’s going on above, you could cause a much larger section of the ceiling to collapse, bringing down wet, heavy drywall and insulation with it. This creates a bigger mess and a more expensive repair. It’s always safer to place a bucket underneath and call a professional who can assess the situation and drain the water safely.
Overlooking Roof Joints and Connections
A leak isn’t always from a simple hole in the middle of your roof. More often than not, water finds its way in through the seams and connections where different materials meet. These vulnerable areas include the flashing around chimneys, skylights, and vents, as well as the valleys where two roof planes join. These spots require careful sealing, and over time, that sealant can crack or wear away. Our inspector training covers these vulnerable areas in detail because they are so often the source of the problem.
Ignoring Other Potential Water Sources
When you’re focused on the roof, it’s easy to miss other potential signs. For example, rusty nails or fasteners on your roof deck are a huge red flag. Rust indicates prolonged moisture exposure and can show you exactly where water has been getting in. It’s also important to consider that the issue might not be a failure of the roofing material itself but something simpler, like clogged gutters forcing water up under the shingles. A comprehensive check, like the one required for a LeakFREE® roof certification, examines the entire roofing system, not just one part of it.
The Right Tools for Accurate Leak Detection
Finding the exact source of a roof leak requires more than just a good eye; it requires the right equipment. Using a combination of modern technology and traditional inspection tools allows you to move from guesswork to a precise diagnosis. This approach not only saves time but also ensures you’re addressing the root cause of the problem, not just patching up a symptom. For professionals, having a well-stocked toolkit is non-negotiable for delivering accurate and reliable assessments. It’s what separates a quick fix from a long-term solution and builds trust with clients who depend on your expertise.
Your Leak Detection Toolkit
To effectively pinpoint a leak, you need a few key pieces of equipment. A solid toolkit starts with basic visual inspection tools like a flashlight and binoculars, but for a truly comprehensive assessment, you’ll want to include more advanced gear. Thermal imaging cameras are incredibly effective, as they reveal temperature differences across the roof surface that can indicate trapped moisture below. A quality moisture meter is also essential for confirming the presence of water in roofing materials. Combining these tools gives you a multi-layered view of the roof’s condition, allowing you to see what’s happening both on the surface and underneath it.
How to Inspect Your Roof Safely
Safety is the top priority during any roof inspection. Before you even think about climbing a ladder, make sure you have the proper safety gear, including a harness, non-slip footwear, and gloves. Always check that your ladder is on stable, level ground and extended at least three feet above the roofline for a secure transition. If you’re working on a steep or slippery roof, consider using roof jacks or a personal fall arrest system. Never inspect a roof during bad weather like rain, high winds, or snow. Remember, no inspection is worth risking your personal safety. If you feel unsure or the conditions seem hazardous, it’s always best to wait or call a certified professional.
Using Moisture Detection Tools
While visual signs like stains are helpful, they don’t always tell the whole story. This is where moisture meters come in. These handheld devices are invaluable for confirming your suspicions and finding hidden moisture that isn’t visible to the naked eye. There are two main types: pin-type and pinless. Pin-type moisture meters use small probes to measure the electrical resistance within a material, giving you a precise reading in a specific spot. Pinless meters scan a larger area to detect moisture below the surface. Using one of these tools allows you to verify the extent of water intrusion and create a clear map of the affected areas.
Binoculars vs. Ladder: When to Use Each
A thorough roof inspection often starts from the ground. Using a good pair of binoculars is a safe and effective way to perform an initial check. You can spot obvious issues like missing shingles, cracked flashing, or debris buildup without taking a single step up a ladder. This ground-level view helps you form a preliminary assessment and identify areas that need a closer look. However, binoculars can’t see everything. For a detailed inspection of seams, seals, and potential hidden damage, you’ll eventually need to use a ladder to get hands-on. The best approach is to use both tools in tandem: start with binoculars to get the big picture, then use a ladder for a targeted, up-close examination.
When to Call a Professional
While a little detective work can be satisfying, there are times when finding and fixing a roof leak is a job best left to the experts. Your safety is the top priority, and some roofing systems are just too complex or dangerous for a DIY approach. A professional has the right tools, safety equipment, and experience to diagnose the problem accurately without causing further damage to your roof or home. Recognizing when to step back and pick up the phone is a crucial part of protecting your property investment. If you find yourself in any of the following situations, it’s time to call a certified inspector.
The Leak Is Hard to Find
Water is a sneaky traveler. It rarely drips in a straight line from the point of entry on your roof to the stain on your ceiling. Instead, it can run along rafters, behind walls, and through insulation, making the true source of the leak incredibly difficult to pinpoint. You might spend hours searching in the wrong place, all while the water continues to cause hidden damage. A professional inspector knows how to trace these winding paths back to the origin. They understand the complexities of different roofing systems and can identify subtle clues that a homeowner might miss, ensuring the actual problem gets fixed, not just the symptom.
Your Roof Is Steep or Unsafe
Getting on your roof is risky business, especially if it has a steep pitch, is multiple stories high, or is slippery from rain or moss. One misstep can lead to a serious injury. The attic can also present its own set of dangers, from old insulation materials like asbestos to weakened joists that can’t support your weight. A professional is trained in safety protocols and has the proper gear, like harnesses and ladders, to work on roofs securely. Don’t risk your well-being for a leak. If you have any doubts about your ability to safely access your roof or attic, it’s always the right decision to call for help.
You Want a Guaranteed LeakFREE® Assessment
A DIY patch might stop a drip for now, but it doesn’t come with a guarantee. For true peace of mind, you need a professional assessment that stands behind its findings. An NRCIA-certified inspector provides a thorough evaluation and can offer a LeakFREE® roof certification, which is the only standardized roof warranty in the industry. This isn’t just a quick fix; it’s a promise of quality and protection. When you hire a certified professional, you’re not just paying for a repair—you’re investing in a verified, leak-free roof backed by a trusted national authority.
You Need a Plan for Prevention
Fixing the current leak is only half the battle. A true roofing expert will also help you prevent future problems. During an inspection, a certified professional doesn’t just look for the active leak; they assess the entire roofing system for signs of aging, potential weak spots, and other vulnerabilities. They can provide you with a detailed report and a proactive maintenance plan to extend the life of your roof. This approach saves you money and stress down the road. The NRCIA provides extensive training and education to ensure our inspectors are equipped to offer these comprehensive, forward-thinking solutions for your property.
Related Articles
Frequently Asked Questions
How often should I have my roof inspected to prevent leaks? A good rule of thumb is to have your roof professionally inspected every two to three years, and always after a major weather event like a hailstorm or hurricane. Regular check-ups allow an expert to catch potential issues like cracked sealant or loose shingles before they have a chance to let water in. Think of it as a preventative health screening for your home; it’s the smartest way to avoid a sudden, costly emergency.
Can a small, slow leak really cause that much damage? Absolutely. In fact, a slow, hidden leak is often more destructive than a sudden, obvious one. Over weeks and months, that steady drip can saturate wood framing, ruin insulation, and create the perfect environment for widespread mold growth. By the time you see a stain, the damage behind your walls and in your attic could already be extensive. Addressing even the smallest leak immediately is critical to protecting your home’s structural integrity.
My roof is brand new, so why could it be leaking? It’s incredibly frustrating, but a new roof isn’t immune to leaks. The most common cause is improper installation. If flashing around chimneys, vents, or skylights wasn’t sealed correctly, or if shingles were nailed improperly, it creates immediate weak points. This is why the quality of the installation is just as important as the quality of the materials, and it underscores the value of having a certified third party inspect the work.
What’s the difference between a standard roof inspection and a LeakFREE® certification? A standard inspection is like a snapshot in time; a professional assesses your roof’s current condition and points out any existing problems or areas of concern. A LeakFREE® certification goes much further. It’s a comprehensive process that not only identifies issues but ensures they are corrected to meet a national standard. The certification then provides an actual warranty against leaks, giving you a guarantee of performance and true peace of mind.
Is it safe to do a temporary patch on my own while I wait for a professional? While it’s tempting to try a quick fix, DIY patches can sometimes do more harm than good. Applying sealant or caulk incorrectly can trap moisture, potentially worsening the problem or making it harder for a professional to find the true source of the leak. If you have water actively coming into your home, your focus should be on containing the water inside with buckets and calling a certified inspector to handle the roof itself.