For roofing professionals, a detailed inspection report is a cornerstone of excellent customer service. When your client is facing a stressful insurance claim, providing them with clear, professional documentation can make all the difference. A thorough report not only builds trust but also helps you advocate effectively on their behalf, ensuring the insurance adjuster understands the full scope of the necessary repairs. It transforms you from a contractor into a trusted advisor. To help you standardize your process and deliver consistent, high-quality results, we’re providing a professional-grade roof inspection report for insurance pdf free download that you can implement in your business right away.
Key Takeaways
- Documentation is non-negotiable: A detailed report with clear photos, specific notes, and a professional repair estimate serves as the foundation for a successful insurance claim, leaving no room for dispute.
- Act quickly and accurately to avoid delays: Prevent common claim pitfalls by inspecting the roof immediately after a storm, taking high-quality photos, and ensuring all your information is complete before submission.
- A certified inspector provides critical credibility: Hiring a professional offers an unbiased, expert assessment that insurance companies trust, ensuring all damage is properly identified and your claim is taken seriously from the start.
What Is a Roof Inspection Report for an Insurance Claim?
When your roof is damaged by a storm, hail, or a fallen tree, your first step is often to contact your insurance company. But before they can process your claim, they need proof. That’s where a roof inspection report comes in. Think of it as the official story of your roof’s condition—a detailed document that outlines every issue, from major damage to minor concerns. A thorough report provides the concrete evidence your insurer needs to understand the situation and approve your claim.
This isn’t just a simple checklist. A professional report includes a written summary of all findings, clear photographs documenting the damage, and a detailed estimate for the necessary repairs or replacement. This package serves as undeniable proof, helping you justify the scope of work required to restore your roof. Without this comprehensive documentation, you risk having your claim undervalued or even denied. A well-prepared report ensures your claim is built on a solid foundation, making the entire process smoother and more successful. It’s the first step toward getting the protection you need, much like a LeakFREE® roof certification provides peace of mind before damage ever occurs.
Why Documentation Is Key for Insurance Claims
Proper documentation is the single most important factor in getting your insurance claim approved. It’s easy to feel rushed after a storm, but one of the biggest mistakes property owners make is failing to capture enough evidence of the damage. An insurance adjuster needs to see exactly what happened, and your report is what tells that story. Without detailed notes and photos, you’re leaving the interpretation up to someone else, which can lead to a lower payout or a complete rejection.
Think of your report as your primary piece of evidence. Every photo and every note strengthens your case, leaving no room for doubt. Using tools like specialized inspection software can help you create a professional, organized report that meets industry standards. This level of detail shows your insurer that you’re serious and have done your due diligence, making them more likely to approve the claim quickly and for the correct amount.
When Insurance Companies Require a Report
Insurance companies almost always require a roof inspection report to accurately assess damage and process a claim. As soon as you notice a problem, it’s critical to act fast. Most insurance policies have specific deadlines for reporting damage, and waiting too long can jeopardize your claim. Submitting a detailed report right away gets the ball rolling and shows you’re complying with your policy’s terms.
Your insurer needs this document to understand the extent of the damage before they send their own adjuster—or to verify what their adjuster finds. The report gives them a clear, unbiased assessment to work from. It’s an essential part of the process for all parties involved, from homeowners to the insurance companies we serve. A professional, third-party report from a certified inspector provides the credibility needed to move the claim forward without unnecessary delays or disputes.
What to Include in Your Roof Inspection Report
A thorough roof inspection report is your most powerful tool when filing an insurance claim. It transforms your professional assessment into a clear, factual document that an insurance adjuster can easily understand and act on. Think of it as building a case: the more organized and detailed your evidence, the stronger your position. A flimsy, incomplete report can lead to delays, disputes, or even an outright denial. On the other hand, a comprehensive report with all the right components demonstrates professionalism and provides the undeniable proof needed to get a claim approved quickly.
The goal is to leave no room for questions or ambiguity. Every key detail, from the weather on the day of the inspection to the specific type of shingle damage, contributes to a complete picture of the roof’s condition. By including the following elements, you create a report that not only serves your client but also meets the rigorous standards of insurance companies. This structured approach ensures you cover all your bases, making the entire claims process smoother for everyone involved. It’s about providing a clear, evidence-backed story of what happened to the roof and what it will take to make it right.
Key Property and Client Details
Before you get into the specifics of the roof’s condition, your report needs to establish the basics. This section sets the scene and provides essential context for the insurance company. Start with the fundamental information: your client’s name and contact details, along with your own business information. Be sure to include the full property address, the exact date of the inspection, and the weather conditions at that time. Documenting details like heavy rain or high winds can be crucial for storm-related claims. Finally, note the roof’s age, type (e.g., gable, hip), and the specific materials used, such as asphalt shingles or metal panels.
Damage Assessment and Notes
This is the core of your report, where you detail your findings. A systematic approach is essential to ensure nothing is overlooked. Using a structured checklist helps you methodically examine every part of the roof, from the shingles and flashing to the gutters and vents. Your notes should be clear, concise, and objective. Describe the damage you observe with specific language—for example, instead of “some shingles are bad,” write “seven cracked asphalt shingles on the southwest-facing slope.” This detailed record is vital for tracking necessary repairs and demonstrating compliance with building regulations. The NRCIA’s specialized inspection software helps inspectors standardize this process for consistent, professional results.
Clear Photographic Evidence
Words can only go so far; photos provide indisputable proof of damage. High-quality images are non-negotiable for a strong insurance claim. Each point of damage noted in your assessment should be accompanied by clear, well-lit photographs. Take pictures from multiple angles—a wide shot to show the location of the damage on the roof, and close-ups to show the severity. For scale, you can place a ruler or a common object next to punctures or hail marks. These visuals help an insurance adjuster, who may never visit the property, fully understand the extent of the problem and validate the need for repairs.
Professional Recommendations and Repair Estimates
A great inspection report doesn’t just identify problems—it proposes solutions. After documenting the damage, you should provide clear, professional recommendations for the necessary repairs or, if needed, a full replacement. This section should outline the specific actions required to restore the roof’s integrity. Including a detailed cost estimate for the proposed work is also a critical step. This gives the client and the insurance company a clear understanding of the financial scope of the repairs. This complete package of findings and actionable next steps provides the powerful documentation needed to support a claim and move forward with confidence. Becoming a certified roof inspector ensures you have the expertise to make these critical assessments.
Get Your Free Roof Inspection Report Template (PDF)
A thorough and professional roof inspection report is your most powerful tool when filing an insurance claim. It provides clear, undeniable evidence of damage and outlines the necessary repairs, leaving little room for dispute. To help you get started, we’re offering a free, professional-grade roof inspection report template. This downloadable PDF is designed to help you document everything an insurance adjuster needs to see, ensuring your claim is organized, comprehensive, and ready for submission. Using a standardized format helps streamline the process and presents your findings in a clear, professional manner.
About the NRCIA Professional-Grade Template
We developed our free downloadable PDF checklist to give homeowners and inspectors a reliable tool for evaluating a roof’s condition. This template isn’t just a generic form; it’s built on the same high standards our own certified roof inspectors use in the field. It guides you through a comprehensive assessment, ensuring you don’t miss a single detail. By using this professional-grade template, you can create a detailed record of your roof’s health, accurately document any problems you find, and make a clear plan for maintenance or repairs.
How to Fill Out the Template, Step-by-Step
Completing the roof inspection report is a straightforward process. Just follow these simple steps to create a complete and professional document:
- Client Information: Begin by filling in the client’s name and property address.
- Inspection Details: Note the date, weather conditions, roof age, and materials.
- Documentation: Walk the property and carefully inspect all parts of the roof, taking detailed notes and clear photos of any damage.
- Recommendations: Based on your findings, suggest specific repairs or maintenance actions.
- Finalization: Sign and date the report to verify its authenticity.
- Delivery: Provide the completed report to the client.
Submitting in Insurance-Compatible Formats
When you’re preparing a report for an insurance claim, detail is everything. Your report becomes the primary piece of evidence, so it needs to be compelling and easy for an adjuster to understand. A strong report should always include high-quality photos of the damage, a written summary explaining the issues, and a professional estimate for the necessary repairs. This level of documentation provides undeniable proof to support your claim. Using a detailed inspection report is one of the most effective ways to ensure your claim is processed smoothly and successfully for your LeakFREE® roof.
How a Detailed Report Strengthens Your Insurance Claim
When you’re dealing with roof damage, the last thing you want is a long, drawn-out battle with your insurance company. A thorough, professional roof inspection report is your single most powerful tool for a smooth claims process. Think of it as the complete story of what happened to your roof, told with clear evidence and expert analysis. It removes guesswork and provides the adjuster with everything they need to approve your claim quickly and fairly. By presenting a comprehensive package of information from the start, you set a professional tone and show that you’ve done your due diligence, making it much harder for your claim to be undervalued or dismissed.
Support Your Claim with Solid Evidence
An insurance claim is only as strong as the evidence supporting it. A detailed inspection report serves as your official proof, combining a written summary, clear photos, and a professional estimate for repairs. This documentation gives you incredible leverage, transforming your claim from a simple request into a well-supported case. Instead of just saying your roof is damaged, you’re showing exactly where, how, and to what extent. This level of detail helps ensure your claim isn’t unfairly denied or paid out for less than you deserve. A report from a certified inspector provides an objective, third-party assessment that insurance companies respect.
Avoid Denials from Poor Documentation
One of the most common reasons insurance claims get rejected is simply a lack of proper documentation. Vague descriptions, blurry photos, or missing information can give an insurer grounds for denial. A comprehensive report eliminates these risks by leaving no room for ambiguity. It systematically outlines every issue, from missing shingles to flashing failures, and connects each point of damage to a specific cause, like a recent storm. Following a structured format ensures all necessary details are included, preventing the back-and-forth that happens when an adjuster has to ask for more information. This is why professional training in roof inspections is so critical—it teaches you how to document damage in a way that meets industry standards.
Speed Up the Claims Process
A complete and organized report can significantly shorten the time it takes to get your claim approved. When an insurance adjuster receives a file with everything they need—clear photos, detailed notes, and repair estimates—they can process it efficiently. This proactive approach minimizes delays and frustration. An incomplete or confusing submission, on the other hand, almost always leads to follow-up questions and requests for more evidence, dragging the process out for weeks or even months. Using professional inspection software can help you generate a clean, easy-to-read report that adjusters can quickly review and act on, getting you closer to receiving your payout and starting repairs.
Key Types of Roof Damage to Document
When you’re building a case for an insurance claim, the details make all the difference. Simply stating that your roof is damaged isn’t enough; you need to show exactly what’s wrong and where. Documenting specific types of damage helps an insurance adjuster understand the extent of the problem and connect it directly to a covered event, like a recent storm. A thorough report with clear categories of damage is your best tool for a smooth and successful claims process. It removes ambiguity and presents a clear, factual account that is hard to dispute.
Think of it as telling a story with evidence—each photo and note is a crucial part of the narrative that proves the damage is new and related to the incident you’re claiming. This organized approach not only strengthens your position but also helps speed up the review process, as the adjuster can quickly assess the scope of work needed. For roofing professionals, providing this level of detail demonstrates your expertise and builds trust with both the property owner and the insurance company. It shows you’ve done your due diligence and are advocating for a fair and accurate resolution. We’ll walk through the most critical types of damage to look for and how to document them effectively to create a report that gets results.
Missing, Cracked, or Damaged Shingles
This is often the most obvious sign of roof trouble. Look for shingles that are cracked, curled at the edges, or completely missing from the roof. You should also note any “bald spots” where the protective granules have been worn or knocked away, exposing the underlying material. Each damaged shingle is a weak point that compromises your roof’s ability to protect your home from the elements. When documenting, take photos from several angles and distances. A wide shot shows the overall pattern of damage, while close-ups of individual shingles provide clear evidence. Be sure to count the number of affected shingles in each section of the roof.
Flashing Failures and Water Intrusion
Flashing is the thin metal material installed around chimneys, vents, skylights, and in roof valleys to direct water away from seams. When it fails, you have a direct path for water to enter your home. Carefully inspect these areas for any flashing that is bent, rusted, cracked, or pulling away from the roof. These failures are critical to document because they often lead to significant water damage and leaks. A problem here can turn a small issue into a major repair, so detailed photos are essential. Proving your roof is sound and well-maintained is key to ensuring it qualifies for a LeakFREE® roof warranty, which highlights the importance of functional flashing.
Gutter Damage and Drainage Issues
Your gutters are a crucial part of your roofing system. If they are clogged with debris, dented, or have pulled away from the house, they can’t do their job. This causes water to back up and overflow, potentially seeping under your shingles and rotting the roof deck and fascia boards. During your inspection, check that the gutters are clear and securely attached. Photograph any blockages, sagging sections, or signs of water stains on the siding just below the gutter line. This evidence shows the insurance adjuster that the damage isn’t isolated and that the entire water management system was impacted by the event.
Punctures and Holes from Storms
Storms can do more than just blow off shingles; they can also cause punctures from hail or falling tree limbs. These holes can be small and difficult to spot from the ground, but they are serious vulnerabilities that lead directly to leaks. Professional inspectors are trained to find these hidden issues that an untrained eye might miss. When you find a puncture, take a close-up photo with a ruler or coin next to it for scale. This helps the insurance adjuster understand the size and severity of the impact. Having a certified roof inspector identify these less obvious damages can significantly strengthen your claim.
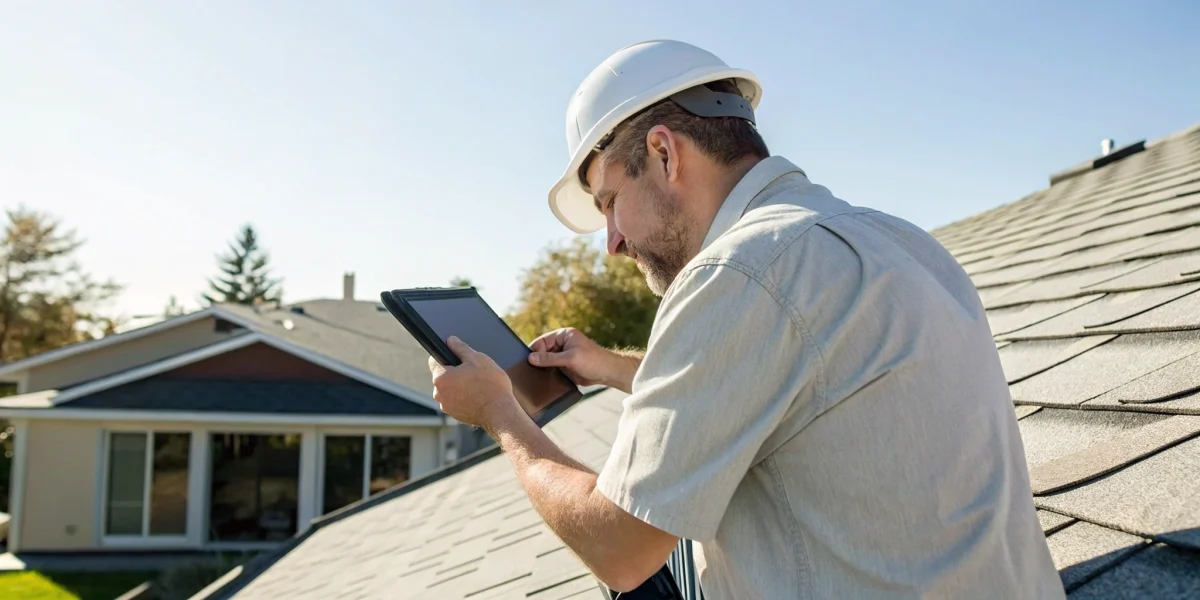
How to Perform a Thorough Roof Inspection
A successful insurance claim starts with a meticulous inspection. It’s not just about finding damage—it’s about documenting it in a way that leaves no room for doubt. Here’s how to approach your inspection methodically to build a strong, undeniable case for your claim.
Safety First: Gear and Precautions
Before you even think about stepping onto a ladder, let’s talk about safety. Your well-being is the top priority. Never attempt to get on a steep, wet, or icy roof without the proper safety equipment and training. This includes a sturdy, well-placed ladder, appropriate footwear with good grip, and a safety harness, especially on higher-pitched roofs. If you feel unsure or the conditions seem unsafe, it’s always best to call a professional. The NRCIA offers comprehensive training for inspectors that covers safety protocols in detail. Remember, no insurance claim is worth risking an injury. Always assess the situation from the ground first and proceed with extreme caution.
Follow a Systematic Inspection Process
A random walk-around won’t cut it. To perform a truly thorough inspection, you need a system. Using a checklist ensures you cover every critical area, from the shingles and flashing to the gutters and downspouts. A quick look from the ground isn’t enough to spot subtle signs of damage. Your process should include examining the roof covering, drainage systems, flashings, and any penetrations like vents or skylights. We recommend inspecting your roof at least twice a year, typically in the spring and fall, and always after a major storm. Using professional inspection software can help you follow a consistent process and log your findings accurately every time.
Documenting Damage the Right Way
This is where your inspection turns into evidence. Failing to properly document damage is one of the fastest ways to get an insurance claim rejected. Your goal is to create a clear, detailed record that tells the full story. For every issue you find, take multiple clear, well-lit photos from different angles—close-ups to show detail and wider shots to provide context. Accompany these photos with precise notes describing the damage, its location, and its measurements. A complete report with photos, a written summary, and a professional repair estimate gives you the solid proof needed for a successful claim and a LeakFREE® certified roof. This level of detail makes your claim easier for an adjuster to approve.
Common Mistakes That Weaken an Insurance Claim
Filing an insurance claim can feel like a high-stakes process, where simple missteps can lead to frustrating delays or even outright denials. After you’ve done the hard work of inspecting and documenting all the damage, the last thing you want is for a preventable error to weaken your case. It’s not just about finding the damage; it’s about presenting it in a way that is clear, credible, and leaves no room for doubt. Insurance companies review thousands of claims, and they have a standardized process for evaluating them. Your goal is to make it as easy as possible for the adjuster to understand the situation and approve the necessary repairs.
Think of your report as the foundation of your argument. If that foundation has cracks—like missing information, blurry photos, or questionable details—the whole claim can crumble. Unfortunately, many well-intentioned homeowners and even some contractors make the same mistakes over and over again. They might rush the inspection, forget to document smaller issues, or wait too long to get started. Each of these errors can give the insurance company a reason to question the validity or scope of the claim. By understanding these common pitfalls ahead of time, you can be more strategic in your approach. Let’s walk through some of the most common mistakes I see so you can sidestep them entirely and build a claim that is solid, professional, and gets approved faster.
Submitting Incomplete Documentation
This is the number one reason claims get held up or denied. An insurance adjuster needs thorough proof to verify a loss, and an incomplete report creates immediate doubt. Simply stating the roof is damaged isn’t enough; you need to provide a complete picture with detailed notes on every single issue you find. A vague report forces the adjuster to make assumptions, which rarely works in your favor. Using a standardized process with comprehensive inspection software ensures you don’t miss a single detail, creating a solid record that leaves no room for questions and helps move the claim forward.
Using Low-Quality Photos
Your photos are your most powerful evidence, but only if they clearly show the problem. Blurry, poorly lit, or distant pictures won’t do you any favors and can seriously weaken your claim. You need to show the adjuster exactly what you saw on the roof. Take high-resolution photos from multiple angles. Get close-ups of specific damage like cracked shingles or failed flashing, but also take wider shots to provide context for where the damage is located. Clear, well-composed photos make the damage undeniable and help the adjuster quickly understand the scope of necessary repairs.
Waiting Too Long to Inspect After a Storm
Time is not on your side after a storm. Most insurance policies have a specific window for filing a claim, and waiting too long can get it denied on a technicality. Beyond the deadlines, a delay can cause more problems for the property. A small leak can quickly turn into major water damage and mold, which may not be covered if you didn’t act promptly. Inspecting the roof immediately after an event makes it much easier to prove that the storm was the direct cause of the damage, strengthening the case for the homeowner and speeding up the approval process.
Claiming Pre-Existing Damage
It can be tempting to try and roll old roof problems into a new storm damage claim, but this is a huge mistake. Insurance is meant to cover sudden and accidental events, not gradual wear and tear from age. An experienced adjuster can easily tell the difference between fresh hail damage and shingles that have been deteriorating for years. Including pre-existing issues not only risks getting those specific items denied but can also cast doubt on the legitimacy of your entire claim. A professional inspection helps establish a clear baseline, ensuring only new, event-related damage is included in the report for your LeakFREE® roof.
When to Hire a Certified Roof Inspector
While you can spot obvious issues from the ground, a professional roof inspection is essential when you’re preparing an insurance claim. An expert can identify hidden damage, accurately assess the roof’s condition, and create the detailed documentation your insurance company needs. But not all inspectors are created equal. Knowing when to call a pro—and which pro to call—makes all the difference in getting your claim approved quickly and fairly.
Hiring a certified inspector provides an objective, third-party assessment of your roof’s health. This is especially important after a major storm, when buying or selling a property, or if you’ve noticed signs of a leak. Their findings carry significant weight with insurance adjusters and can be the deciding factor in a successful claim.
The Advantage of an NRCIA-Certified Inspector
When you hire an inspector, you’re trusting them to catch every detail. An NRCIA-certified inspector has gone through specialized training and is held to rigorous standards, ensuring they can spot subtle or hidden damage that an untrained eye would miss. This level of expertise means you get a reliable, thorough report that gives you—and your insurance company—a clear picture of the roof’s condition.
This certification isn’t just a piece of paper; it’s your assurance of quality and integrity. An NRCIA inspector provides an unbiased evaluation focused solely on the facts, which is exactly what you need to build a strong insurance claim. Their detailed findings give you peace of mind and the credible evidence required to get the coverage you deserve.
What to Ask a Potential Inspector
Before you hire someone, it’s smart to ask a few key questions to make sure they’re the right fit. Start by confirming they are certified and ask if they have experience handling inspections for insurance claims. A great question to ask is whether they are willing to meet with your insurance adjuster on-site. Having your inspector present can help ensure the adjuster sees the full extent of the damage and understands the necessary repairs.
You should also ask to see a sample report to get a feel for their documentation style. Make sure their reports are clear, detailed, and include high-quality photos. Finally, ask about their process and what their inspection includes. A qualified professional will be happy to walk you through their methods and answer any questions you have.
What to Expect for Costs and Timelines
The cost of a professional roof inspection typically ranges from $75 to $675. The final price depends on several factors, including the size and complexity of your roof, its accessibility, and the type of inspection you need. For example, a basic visual inspection will cost less than a more intensive one that includes moisture detection or a LeakFREE® roof certification.
Be sure to ask for a quote upfront so there are no surprises. You should also inquire about the timeline for receiving the final report. After the inspection, a professional should be able to deliver a detailed report within a few business days. Getting this document quickly is important, as many insurance policies have deadlines for filing a claim after a damage-causing event.
How to Submit Your Report to an Insurance Company
Once your roof inspection report is complete, the next step is getting it into the hands of the insurance company. How you handle this final step can significantly impact the outcome of your claim. A professional, well-organized submission shows you’re serious and makes it easier for the adjuster to approve your request. Think of it as the final, crucial piece of the puzzle. By following a few simple guidelines, you can present your case clearly and confidently, setting yourself up for a smoother, faster process.
Format and Organize Your Report Correctly
Your report needs to be easy for an insurance adjuster to read and understand at a glance. Start with a clear summary page that outlines the key findings, followed by the detailed sections of your inspection. Use simple, direct language and avoid overly technical jargon that could confuse someone outside the roofing industry. A detailed inspection report with photos, a written summary, and an estimate for repairs gives you strong proof for your insurance claim. Label your photos clearly and reference them directly in your notes so the adjuster can easily connect the description to the visual evidence. A clean, logical layout helps your claim get processed faster.
Include All Required Supporting Documents
A common reason for claim delays or denials is incomplete paperwork. Before you send anything, double-check the insurance company’s requirements. They will likely need more than just the inspection report. This can include proof of ownership, maintenance records, and any correspondence you’ve had about the damage. Gather everything in one place and submit it as a single, complete package. Forgetting a key document can send your claim to the bottom of the pile. Taking the time to ensure you have all the necessary documents can prevent weeks of frustrating back-and-forth communication and get you closer to a resolution.
How to Follow Up and Communicate Effectively
After you’ve submitted your report, your work isn’t quite done. Proactive communication is essential. Keep a simple log of every interaction with the insurance company, including the date, time, and the name of the person you spoke with. Don’t be afraid to follow up if you haven’t heard back within the timeframe they provided. A polite email or phone call can keep your claim moving forward. By staying organized and engaged, you can avoid common roof claim mistakes and show the insurer that you are on top of the process. This helps ensure your claim is handled efficiently and fairly.
Related Articles
- Insurance Claim Inspections – NRCIA
- Roof Inspection for Insurance Claim: A Guide
- Insurance Inspection Request – NRCIA
- Free Roof Inspection Report for Insurance PDF Template
Frequently Asked Questions
Is a professional report really necessary if my insurance company is sending their own adjuster? Yes, it’s a very good idea. The adjuster sent by your insurance company works for them, and their primary goal is to assess the damage from the insurer’s perspective. An independent report from a certified inspector serves as your own expert evidence. It ensures you have a detailed, third-party assessment before the adjuster even arrives, giving you a strong baseline and powerful leverage if there are disagreements about the scope of the damage.
Can I use the free template to do the inspection myself, or should I always hire a professional? Our template is a fantastic tool for routine maintenance checks or for getting an initial sense of your roof’s condition. However, when it comes to an official insurance claim, a report from a certified inspector is far more powerful. Professionals are trained to identify subtle damage that an untrained eye would miss, and their certified report carries significant credibility with insurance companies, making your claim much harder to dispute.
Should I document minor issues like a few missing granules, or just focus on the major damage? You should document everything. What looks like a minor issue can often be a sign of a more significant, widespread problem. For example, granule loss across the roof can indicate that the shingles have reached the end of their lifespan and were more susceptible to storm damage. Documenting every detail creates a complete and accurate picture, which is essential for justifying the full scope of repairs needed.
Is paying for an independent roof inspection report worth the cost? Absolutely. Think of the inspection fee as an investment in your claim. The cost of a professional report is a small fraction of the potential cost of an undervalued or denied claim. A detailed, evidence-backed report from a certified inspector can be the deciding factor that gets your claim approved for the full amount, often paying for itself many times over by ensuring you get a fair settlement.
What’s the next step if my claim is denied even with a detailed report? A detailed report is your best first line of defense, but denials can still happen. If your claim is rejected, your report becomes your primary tool for an appeal. The first step is to request a formal written explanation for the denial from your insurance company. You can then use your inspection report to counter their points with factual evidence. This documentation is crucial for proving your case during the appeals process.