You don’t need a toolbox and a decade of experience to know if your roof was installed properly. While the technical details are complex, many of the most serious installation mistakes leave behind obvious visual clues. Things like crooked shingles, messy flashing, or even a sagging roofline are clear indicators that something is wrong. This guide is designed for homeowners, not roofing experts. We’ll break down the key signs of roof installation error into simple, actionable checks you can perform yourself. Knowing what to look for is the first step in holding your contractor accountable and ensuring your home is secure.
Key Takeaways
- Your First Inspection Starts from the Ground: You can spot many serious installation errors without a ladder. Look for uneven or misaligned shingles, damaged metal flashing around chimneys, and any sagging in the roofline, as these are clear signs of poor workmanship.
- Hidden Flaws Cause the Biggest Problems: The most expensive issues often come from mistakes you can’t see, like incorrect shingle nailing that leads to leaks or poor attic ventilation that shortens your roof’s lifespan and increases energy bills.
- Document Issues and Get a Second Opinion: If you suspect a problem, contact your original contractor first. If that doesn’t resolve it, hire an independent, certified inspector to get an unbiased report, which is crucial for holding the installer accountable or making a warranty claim.
How to Spot a Bad Roof Installation
A new roof is a major investment, so the last thing you want is for it to be installed incorrectly. The good news is you don’t have to be a roofing expert to notice when something is off. Many of the most common installation errors are visible from the ground. Knowing what to look for can help you catch problems early before they turn into costly, long-term damage. Here are some of the key warning signs that your roof wasn’t installed with the care and expertise it deserves.
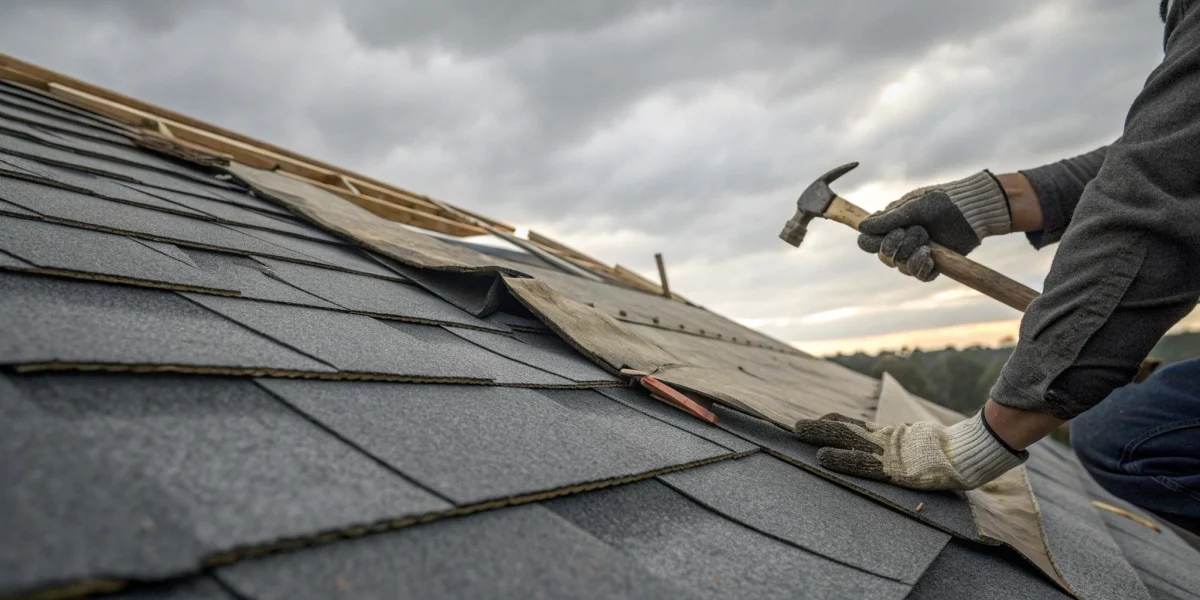
Shingle Problems You Can See
Take a step back and look at the overall pattern of your shingles. They should lie flat and form a consistent, uniform pattern across the entire roof. If you see shingles that look wavy, crooked, or misaligned, it’s a clear sign of a poor installation. Shingles are designed to be staggered, much like bricks in a wall, to create a watertight seal. If the vertical lines between shingles line up, it creates a direct path for water to seep underneath. A professional installation results in straight, clean lines that protect your home and contribute to a LeakFREE® roof. Anything less is a red flag.
Missing or Damaged Flashing
Flashing is the thin metal material installed wherever your roof meets another surface, like a chimney, vent pipe, or dormer wall. Its job is to direct water away from these vulnerable seams. If the flashing is missing, bent, or improperly installed, you’re practically guaranteed to have leaks. For example, the flashing around a chimney should be a two-part system where one piece is integrated directly into the chimney’s mortar joints. If it’s just sealed with caulk or tar, it will fail. A trained certified roof inspector knows these details are non-negotiable for a secure roof.
An Uneven or Sagging Roofline
Your roofline should be straight and strong. If you notice any sagging, dipping, or bumpy spots, it points to a serious problem. An uneven surface can mean the decking underneath the shingles wasn’t installed correctly, or worse, it could indicate a structural issue with the roof itself. These aren’t just cosmetic flaws; they create low points where water can pool and eventually penetrate the roof. A sagging roofline is a major warning sign that requires immediate attention, as it compromises the entire roofing system’s integrity and the safety of your home.
Telltale Signs of Water Damage
Sometimes, the most obvious signs of a bad roof installation appear inside your home. Look up at your ceilings and along the tops of your walls for any water stains or discoloration—these are classic signs of a leak. You should also keep an eye on the roof itself. If you notice dark spots or streaks appearing on your new shingles a few weeks or months after installation, it could mean water is getting trapped underneath. This trapped moisture can lead to rot, mold, and significant damage over time, which is why it’s so important for homeowners to address these signs right away.
Your Ground-Level Roof Inspection Checklist
You don’t need to climb a ladder to spot potential roofing problems. A careful walk around your property can reveal a lot about the quality of your roof installation. Knowing what to look for helps you catch issues early before they turn into major headaches. Use this checklist to perform a quick visual inspection from the safety of the ground. This simple walkthrough can give you peace of mind or signal that it’s time to call in a professional for a closer look.
What to Look For on the Outside
Start by scanning the entire surface of your roof. Do you see any shingles that are missing, cracked, or sticking up? Shingles that lift or curl often indicate they weren’t nailed correctly—the nails might be too shallow, driven too deep, or placed in the wrong spot. It could also mean the adhesive strips didn’t seal properly, leaving them vulnerable to wind. Also, look for shingles that don’t line up in straight, consistent rows. Misalignment isn’t just a cosmetic issue; it creates gaps where water can seep underneath, leading to rot and leaks. A properly installed roof should look uniform and lie flat across its entire surface.
Gutter and Drainage Problems
Your gutters are a critical part of your roofing system. Check to see if they are sagging or pulling away from the house. Gutters need a slight, consistent slope toward the downspouts to channel water away effectively. If they look perfectly level, water can pool and overflow, even when they’re clean. Pay attention to the placement, too. If gutters are installed too far below the roof’s edge, rainwater can sheet right over them, splashing against your home’s foundation. When they’re too close, water can get behind them and damage the fascia boards. Proper drainage is key to protecting both your roof and your foundation.
Issues Along Ridges and Edges
The edges and peak of your roof (the ridge) are high-stress areas that deserve a close look. The roof’s edges should appear clean, straight, and smooth. You shouldn’t see any loose or curling shingles, nor should the underlying materials be exposed. Next, look at the flashing—the metal pieces installed around chimneys, skylights, and vents. Flashing is designed to create a waterproof seal in these vulnerable spots. Make sure it isn’t bent, rusted, or pulling away from the roof or chimney. Properly installed flashing is one of the most important parts of a LeakFREE® roof, preventing water from getting into some of the most common problem areas.
Excessive Granule Loss
Asphalt shingles are coated with granules that protect them from the sun’s UV rays and add color. While it’s normal to see a small amount of granule loss, especially on a new roof, finding large amounts in your gutters or on the ground is a red flag. This can indicate premature aging or poor quality shingles. Also, look for dark spots or “bald” patches on the shingles where granules have worn away. If you notice these spots appearing a month or two after an installation, it could be an early sign that water is getting trapped under the shingles, which can quickly lead to leaks and more significant damage.
Common Mistakes Roofing Contractors Make
Even the most well-intentioned roofing projects can go wrong. Sometimes, it’s due to a simple oversight, and other times, it’s a lack of proper training. These errors aren’t just cosmetic—they can lead to leaks, structural damage, and a roof that fails long before its time. Understanding these common pitfalls is the first step in knowing what to look for on your own roof.
For roofing professionals, avoiding these mistakes is what separates a good business from a great one. It’s why ongoing education and a commitment to industry standards are so critical. For homeowners, knowing these red flags can help you spot a problem early and hold your contractor accountable. From the way shingles are nailed down to the unseen ventilation in your attic, the details make all the difference in a roof that’s built to last.
Incorrect Shingle Nailing
This is one of the most frequent and damaging installation errors. Proper shingle nailing is both an art and a science. Shingles need to be staggered, much like bricks in a wall, to create a solid barrier against water. If the seams line up vertically, it creates a direct path for water to seep underneath. Just as important is where and how the nails are placed. Each nail must be driven into a specific spot—the nail strip—and set flush with the shingle’s surface. If a nail is driven too deep, it can tear the shingle; if it’s too shallow, it leaves a bump and won’t hold properly. This is a fundamental skill covered in any professional roofing training portfolio.
Flashing Mistakes Around Vents and Chimneys
Flashing is the metal material that seals the joints where your roof meets another surface, like a chimney, vent pipe, or dormer wall. These are the most vulnerable spots for leaks, and flashing is their primary defense. A common mistake is installing flashing incorrectly or forgetting a key piece, like the counter-flashing that should be sealed directly into the chimney’s mortar. If you see rust stains, gaps, or loose pieces of metal around these areas, it’s a major red flag. A certified inspector knows that these transition points are critical and will examine them closely for any signs of failure.
Poor Ventilation and Sealing
What happens in your attic has a huge impact on your roof’s lifespan. A poorly ventilated attic traps heat and moisture, which can bake your shingles from below in the summer and lead to ice dams in the winter. This hidden issue can accelerate the aging of your entire roofing system and even drive up your energy bills. Proper ventilation requires a balanced system of intake and exhaust vents. If a contractor blocks vents or doesn’t install enough of them, they’re setting your roof up for premature failure. This is why a thorough inspection always includes a look inside the attic.
Wrong Materials or Measurements
Not all roofing materials are suitable for every roof. For example, standard asphalt shingles aren’t designed for low-slope or flat roofs because they can’t shed water effectively, leading to pooling and leaks. Using the wrong material for your roof’s pitch is a rookie mistake that can have costly consequences. Similarly, inaccurate measurements can result in material shortages or improper overlaps, creating gaps where water can penetrate. Using professional inspection software helps contractors ensure every measurement is precise and that the right materials are specified for the job, preventing these kinds of fundamental errors.
Check Your Attic: What to Look For Inside
Sometimes, the most compelling evidence of a faulty roof installation isn’t on the roof at all—it’s hiding right above your head. A quick, careful trip into your attic can reveal problems you’d never spot from the ground. Think of your attic as the roof’s diagnostic center; it tells the story of what’s happening on the other side of the sheathing. Before you even think about climbing a ladder, grabbing a flashlight and peeking inside can give you a clear picture of your roof’s health.
What you’re looking for are the subtle (and not-so-subtle) signs that water, moisture, or even daylight are getting in where they shouldn’t. These clues often appear long before a stain shows up on your living room ceiling, giving you a critical head start on fixing the problem. A well-installed roof creates a complete barrier, but a poorly installed one leaves behind gaps and weaknesses that compromise your entire home. Your attic is where those weaknesses first become visible, making it an essential part of any roof assessment. Taking a look inside is a simple, actionable step you can take to protect your investment and ensure you have a LeakFREE® roof over your head.
Warning Signs from the Inside
When you’re in the attic, you’re looking for anything that seems out of place. Your attic should be dry, evenly lit (by fixtures, not the sun), and free of any musty smells. The signs of a bad installation are often quiet but distinct. Pay attention to the insulation, the underside of the roof deck, and the air itself. These elements will give you a reliable report on your roof’s performance. Catching these issues early can be the difference between a simple repair and a major structural problem down the road.
Damp Insulation and Moisture
One of the most obvious red flags is damp or compressed insulation. Insulation should be fluffy and dry. If you see areas that are matted down, discolored, or feel damp to the touch, you have a moisture problem. This is a classic sign that water is getting trapped under the shingles and seeping through the roof deck. Also, look up at the wood sheathing. Dark streaks or water stains are clear indicators of a leak, pointing directly to an installation error above that spot.
Signs of Poor Ventilation
A properly installed roof includes a robust ventilation system to manage heat and moisture in the attic. If the contractor failed to install adequate vents or blocked them, your attic can become a trap for humid air. Signs of poor ventilation include a stuffy, excessively hot feeling, condensation on pipes or wood, or even frost in colder climates. Over time, this trapped moisture can lead to mold and mildew growth on the rafters and sheathing, which not only damages the structure but also affects your home’s air quality.
Daylight Peeking Through the Roof
This one is as straightforward as it gets: if you can see daylight coming through your roof, you have a problem. Turn off your flashlight and look for any pinpricks of light. These tiny holes, often around nails that missed the rafters or along seams, are direct entry points for water. Seeing any light at all is a sign of a significant installation mistake. It confirms there’s a breach in your roof’s defenses and means it’s time to call in a professional to assess the extent of the issue. An NRCIA certified inspector can pinpoint the source and recommend the right course of action.
How Weather Reveals Installation Flaws
A brand-new roof might look perfect on a sunny day, but the real test comes when the weather turns. Rain, snow, wind, and even extreme heat can quickly expose hidden flaws from a poor installation. These elements put stress on every component of your roofing system, from the shingles and flashing to the ventilation underneath. If a contractor cut corners, used the wrong materials, or simply made a mistake, bad weather will find the weak spot. Think of it as nature’s own quality control check. Paying attention to how your roof performs during and after a storm can give you the earliest and clearest signs that something isn’t right, long before a small issue becomes a catastrophic failure.
What to Check After a Storm
The most direct way to spot an installation error is to look for water where it doesn’t belong. After a heavy rain or snowmelt, take a few minutes to check for signs of moisture inside your home. Grab a flashlight and head to the attic. Look for damp spots on the underside of the roof deck, wet insulation, or any drips. Back downstairs, scan the ceilings on your top floor for discoloration or water stains. A properly installed roof should keep your home completely dry. Any evidence of water intrusion, no matter how small, is a major red flag. It’s a clear sign that a seal has failed, flashing is incorrect, or shingles are compromised—all pointing back to the quality of the installation and the need for a professional evaluation to ensure you have one of the industry’s best LeakFREE® roof certifications.
Problems Caused by Heat and Cold
Water leaks aren’t the only weather-related symptom of a bad roofing job. Extreme temperatures can reveal critical flaws in your attic’s ventilation system, which is an integral part of a proper roof installation. If a contractor failed to install adequate ventilation, hot, moist air gets trapped in the attic during the summer. This intense heat can essentially bake your shingles from the inside out, causing them to curl and degrade much faster than they should. In the winter, that same trapped moisture can lead to condensation, mold growth, and the formation of destructive ice dams along your eaves. Poor ventilation is a hidden issue that dramatically shortens your roof’s lifespan, and it’s a classic sign of an installer who didn’t understand the whole roofing system.
Higher Energy Bills
Have your heating or cooling costs suddenly spiked since your new roof was installed? Don’t just blame the utility company. Your roof plays a huge role in your home’s energy efficiency, and a sudden increase in your bills can be a subtle sign of an installation error. This often ties back to poor ventilation and improper sealing. When an attic can’t breathe correctly, your HVAC system has to work overtime to keep your home comfortable, fighting against the super-heated air in the summer or heat loss in the winter. This is a problem that affects everyone from homeowners to property managers, which is why a thorough inspection is so important for all the different clients we serve. If your energy bills are climbing, it could mean your new roof is failing at one of its most important jobs.
The Real Cost of a Bad Roof Installation
A poorly installed roof is more than just a headache; it’s a financial liability waiting to happen. While you might save a few dollars upfront by choosing a less experienced or cheaper contractor, the long-term costs can be staggering. The problems created by a bad installation often aren’t obvious right away, but they can quietly cause damage that affects your home’s safety, value, and your peace of mind. From hidden water damage to voided warranties, the fallout from cutting corners on your roof can impact your finances for years to come. Understanding these risks is the first step in protecting your biggest investment.
Water Damage and Structural Risks
The most immediate threat from a bad roof installation is water intrusion. When shingles aren’t properly aligned or flashing is installed incorrectly, your roof becomes vulnerable to leaks. You might first notice subtle signs like water stains on your ceilings or walls. Over time, this moisture can lead to mold, rot, and serious structural damage to your home’s frame. A sagging roofline is another major red flag, indicating that water may have compromised the underlying supports. These issues don’t just require a simple patch; they often demand extensive and expensive repairs to both the roof and the interior of your home, which is why a LeakFREE® roof certification provides such crucial protection.
Voided Warranties and Insurance Headaches
One of the most frustrating consequences of a bad roof installation is discovering your warranty is void. Roofing material manufacturers have very specific installation requirements, and if your contractor doesn’t follow them to the letter, the manufacturer can refuse to cover any material defects. To make matters worse, most standard homeowner’s insurance policies do not cover damage resulting from poor workmanship. This leaves you in a tough spot, responsible for the full cost of repairs or even a full replacement. It’s a costly lesson in the importance of hiring a qualified professional who understands and adheres to industry standards, a core principle for every NRCIA certified inspector.
Lower Property Value and Expensive Repairs
Your roof is one of the first things a potential buyer or home appraiser looks at. A roof with visible installation errors, like uneven shingles or sloppy flashing, can significantly lower your property’s value and scare off buyers. Even if you’re not planning to sell, you’re still on the hook for future repairs. Fixing installation mistakes isn’t a simple DIY project; it requires a professional to diagnose the full extent of the problem and perform the necessary corrections. This process often starts with a thorough inspection to identify all the hidden issues, adding another layer of cost. For real estate professionals, ensuring a property has a properly installed and certified roof is key to a smooth transaction.
Found an Error? Here’s What to Do Next
Discovering a problem with your new roof is frustrating, but taking the right steps can make all the difference. If you suspect your roof was installed incorrectly, don’t wait for the problem to get worse. Acting quickly and methodically can help you get the resolution you deserve and protect your home from further damage. Here’s a clear, step-by-step plan to follow.
Step 1: Contact the Original Contractor
Your first move should always be to reach out to the company that did the installation. Before you call, pull out your contract and any warranty documents. A reputable roofer stands by their work and will often correct their mistakes, especially if a workmanship warranty is in place. When you speak with them, calmly explain the issues you’ve found and reference your agreement. A professional contractor will want to maintain their reputation and should be willing to inspect the roof and schedule repairs.
Step 2: Get a Second Opinion
If the original contractor is unresponsive or denies there’s a problem, it’s time for a second opinion. Hire a different, trusted roofing professional to perform a thorough inspection. An unbiased assessment from an expert will give you a clear, documented report of all the installation errors and resulting damage. This documentation is crucial if you need to escalate the issue. For complete peace of mind, consider a certified roof inspector who can provide an impartial and detailed analysis of your roof’s condition.
Step 3: Know Your Legal and Insurance Options
If the original company still refuses to fix the faulty installation, you may need to explore other avenues. It’s important to understand that most standard homeowner’s insurance policies do not cover damage caused by poor workmanship, but you should always review your specific policy to be sure. If you’re facing significant repair costs due to the contractor’s negligence, consulting with a lawyer who specializes in construction law might be your next step. They can advise you on your rights and the best way to proceed.
Why You Need to Act Fast
Ignoring signs of a bad roof installation will only lead to bigger, more expensive problems down the road. A small leak can quickly turn into widespread water damage, mold growth, and even structural issues. The longer you wait, the more damage your home will sustain. Addressing the problem immediately not only protects your property but also strengthens your case with the original contractor or your insurance company. Getting prompt repairs or a full replacement is essential to stop further damage and ensure your home is safe and secure.
When to Call a Professional Inspector
While a ground-level check can help you spot obvious problems, some installation errors are subtle and require a trained eye. If you have a gut feeling that something is off with your new roof, or if you’ve noticed any of the warning signs we’ve covered, it’s time to bring in an expert. A professional inspection provides a definitive answer about the quality of the work and gives you a clear path forward for any necessary corrections.
I get it—calling another professional can feel like you’re second-guessing your original contractor. But it’s better to think of it as protecting your investment. Your roof is one of the most critical components of your home, and a faulty installation can lead to thousands of dollars in damage, from hidden leaks to structural issues. An independent, third-party assessment ensures you have an unbiased report on your roof’s condition. This is especially important if you need to discuss repairs with your original installer or file a warranty claim. Getting a professional involved early can save you major headaches and expenses down the road.
Red Flags That Need an Expert Eye
Some issues are clear indicators that you need a professional opinion, and fast. If your roof starts leaking shortly after installation, that’s a major red flag that demands immediate attention. You should also look for missing or improperly installed components. This includes shingles that are sticking up, misaligned, or don’t have the correct offset, which can create pathways for water. Pay close attention to the flashing around chimneys, vents, and skylights. If it’s missing, bent, or not sealed correctly, your home is vulnerable to water intrusion. These aren’t minor cosmetic flaws; they are signs of a poor installation that can compromise your entire roofing system and need an expert diagnosis.
The Benefit of an NRCIA Certified Inspection
When you decide to get a second opinion, you want an inspector who truly knows what they’re looking for. An NRCIA certified inspector has undergone specialized training to identify installation errors that a general contractor might overlook. They follow a standardized process to provide a thorough and objective assessment of your roof’s condition, from shingle placement and nailing to underlayment and ventilation. This professional expertise ensures that every detail is examined. An NRCIA inspection gives you a comprehensive report you can trust, detailing any issues and empowering you with the documentation needed to seek the right corrective actions.
What a LeakFREE® Certification Means for You
Following a successful inspection and any necessary repairs, your roof may qualify for a LeakFREE® certification. This isn’t just a piece of paper; it’s your assurance that the roof meets the highest industry standards for quality and performance. It signifies that the installation has been thoroughly vetted and is built to last, protecting you from leaks and other potential damage. For homeowners, this certification provides incredible peace of mind. For property managers and real estate professionals, it’s a valuable asset that confirms the integrity of the roof, adds tangible value, and can make a property stand out in a competitive market.
Related Articles
- Common Roofing Problems and How to Address Them – NRCIA
- roofcheck Archives – NRCIA
- Roofing Advice Archives – NRCIA
- Paul Watrous, Author at NRCIA
Frequently Asked Questions
How soon can I expect to see signs of a bad roof installation? Some problems, like crooked shingles or sloppy flashing, are visible the moment the job is done. Other issues are more subtle and may not appear for weeks or even months. Often, the first major rainstorm or temperature swing is what reveals hidden flaws like slow leaks or poor ventilation, which is why it’s smart to pay close attention to your roof’s performance during its first year.
My new roof is already losing a lot of granules. Should I be concerned? It’s normal for a new asphalt shingle roof to shed some of its surface granules right after installation—think of it as excess from the manufacturing process. However, if you continue to find large amounts of granules in your gutters or on the ground several weeks later, it could be a red flag. This can point to low-quality materials or damage that occurred during installation, so it’s definitely something to keep an eye on.
Will a bad installation void my shingle manufacturer’s warranty? Yes, it absolutely can, and this is one of the biggest financial risks of a poor installation. Shingle manufacturers have very specific instructions for how their products must be installed. If your contractor didn’t follow those guidelines for things like nailing, underlayment, or ventilation, the manufacturer can refuse to honor the warranty, leaving you to cover the full cost of any material failures.
The original contractor won’t fix the mistakes. What’s my next step? If the installing contractor is unresponsive or unwilling to make corrections, your best move is to get an independent, third-party inspection. A certified inspector can provide an unbiased, detailed report that documents all the installation errors and any resulting damage. This professional report gives you the clear evidence you need to decide on your next steps, whether that involves hiring a new company for repairs or exploring your legal options.
Can I just fix a small issue like a crooked shingle myself? I would strongly advise against it. What appears to be a simple cosmetic flaw on the surface can often be a sign of a more complex problem underneath, like improper nailing or issues with the underlayment. Attempting a DIY fix without understanding the entire roofing system can easily cause more damage, create a new leak, and may even void any workmanship warranty you have from the original installer. It’s always safer to have a professional assess the situation.